Mitre Saw - Evolution R255SMS-DB
Self-Induction Required
This equipment requires an self-induction prior to use. For your own safety and to avoid damage to the equipment do not attempt to use it until you have completed this.Laceration / Entanglement Hazard
This equipment is hazardous to the user and others in the space.PPE Required
This equipment requires the use of eye protection / hearing protection / extraction during use.Induction
This machine uses our two-part self-induction system. Part 1 of the induction comprises the study materials below. Part 2 comprises an online test to demonstrate you have understood part 1.
Once you have studied the materials below, you can find Part 2 on the access control portal in the Hackspace. You can learn more about that here…
Once you successfully complete the part 2 test, your card will be automatically accredited for use with the table saw and you can start using it straight away.
Health & Safety Warnings
- Wood dust is hazardous! You must always use the portable dust extractor with the mitre saw, and empty the extractor bin when it's full.
- The mitre saw is loud! You must wear ear protection, and offer it to those around you before using the saw.
Intro
This is our mitre saw:
What Can I Use the Mitre Saw For?
The mitre saw is for cutting seasoned dimensional timber, or timber-based sheet materials such as ply or MDF.
It should only be used to cut materials that can be held firmly against the bed and the fence without risk of rotation. This generally means the materials must have regular flat sides.
You must never use the mitre saw for:
- Dowels, pipes, and other shapes that could start spinning when the blade touches them.
- Other materials, such as plastic, resin, or metal.
- Irregularly-shaped pieces of timber (eg: tree branches, lathe blanks) that can't be held firmly against both the bed and fence.
- Fresh-cut, “green”, or unseasoned timber.
- Stuff that doesn't fit in the saw.
It should only be used to cut materials that can be held firmly against the bed and the fence without risk of them twisting, spinning or otherwise moving when the saw blade touches them. This generally means the materials must have regular flat sides.
Mitre saws are designed for making cross cuts. A cross-cut is a cut across the length of a piece of timber (usually across the grain).
Setup and Preparation
Before making a cut with the mitre saw, you must:
- Set up the working area:
- Inspect the machine for obvious defects or damage.
- Ensure the working area is clear of trip-hazards and obstacles.
- Connect the fixed extraction system is connected to the port on the back of the machine.
- Check if the big extractor is full, and empty it if needed.
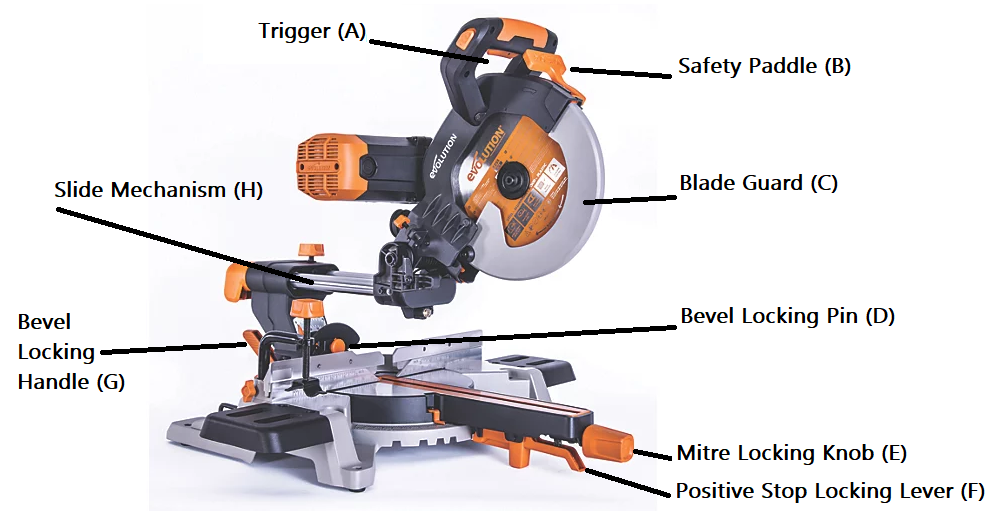
- Adjust the mitre angle, if needed:
- Turn the Mitre Locking Knob anti-clockwise locking to release it. (E)
- Pull up the Positive Stop Locking Lever under the knob. (F)
- Push the Rotary Table to the desired angle.
- Tighten the Mitre Locking Knob again.
- Adjust the bevel angle, if needed:
- Loosen the Bevel Locking Handle. (G)
- Pull out the 0˚ Bevel Locking Pin which secures the Cutting Head in the vertical position. (D)
- Tilt the cutting head to the required angle. A protractor scale is provided as an aid to setting.
- Tighten the bevel lock handle.
- Check that the blade will not foul the fence when the saw is used in this position, and adjust the fence if needed.
- NB: A positive stop is provided for a bevel angle of 33.9˚, both left and right. This is accessed using the Bevel Pins.
- Stay safe:
- Put on hearing protection, and inviting others in the room to do the same.
- Put on eye protection.
- Tie back long hair, and remove any loose or dangly items (jewellery, baggy sleeves, hoody tassels, etc).
 Fig. 62
  Fig. 63
 Fig. 65
  Fig. 66
  Fig. 67
  Fig. 68
Making a Cut
When making a cut, you must:
- Hold your material firmly against the table and the fence throughout the cut, but never place your hands within the 'no hands zone', which is 6“ (150mm) either side of the blade. You can see the 'no hands zone' marked in red on the image of the saw above.
- Consider using a hold-down clamp, but check that it is positioned that it does not interfere with the path of the blade or other moving machine parts.
- Press the Safety Button with your thumb to allow the cutting head to be lowered.
- Before touching the Trigger to start the blade, make a ‘dry run’ so that you can see the path of the blade, ensuring it does not contact the blade, clamps, fingers, etc.
- Press the Trigger to start the blade. Allow the blade to reach full speed before bringing it in contact with the workpiece.
- Lower the saw head slowly through the material.
- If you hear the saw motor straining or slowing down, then either cut slower, or use the slide mechanism to make multiple passes.
- Never pull the saw forwards on it's slide through the workpiece. Only ever push it backwards through the workpiece.
- Never reach into the saw, or across it, while it is running.
- Release the trigger switch to switch off the saw.
- Allow the cutting head has to rise to its upper position, with the blade guard completely covering the blade, before removing your hands.
- Never reach across or into the saw while it is running.
- Never retrieve your material or waste from the saw while it is running.
After Cutting
After making a cut, you must:
- Switch off the extractor.
- Sweep up saw and work area.
- If you have been cutting at a mitre or bevel, return the saw to its normal position of 0˚ mitre and bevel for the next user.