Table of Contents
ProEdge Sharpening System - Robert Sorby

Induction Required
This equipment requires an induction prior to use. For your own safety and to avoid damage to the equipment do not attempt to use it until you have been inducted.Laceration / Entanglement / Burn Hazard
This equipment is hazardous to the user or those around them, take care during use.PPE Required
This equipment requires the use of eye protection during use and dust masks.Risks
Risk Assessment
- To Be Added
Safety and Conduct
- It is vital that eye protection and a form of dust mask are ALWAYS worn and a dust extraction system is in operation or the roller shutter door is opened to increase air flow.
- Ensure loose clothing and long hair are kept well away from any moving parts.
- Maintain a clean working environment when operating grinding and sharpening systems as sparks from this type of equipment are extremely hot and can cause a fire if they get onto wood dust.
- Always switch off and disconnect from the wall socket mains electric supply before changing belts or jigs or making any adjustments to the system.
- There is a risk of tools, debris or the workpiece being ejected from the machine, if the bench isn't clear, of tools or the workpeice are not held or fixed in place correctly. Please tidy area before use and follow the directions of use in the manual and below.
- There is a risk of the belt braking during use please check the belt for wear and tear to minimise this risk.
- Do not touch the belt with your hands when it is running and make sure the side guard is in place before turning it on.
- Make sure the sharpener is securely fixed to the bench to prevent it toppling during use.
Due to proximity to the grinder and welder only this cannot be used when they are in use and vice versa, please be considerate of other members when using equipment in the hot works area for long periods of time.
As per Hackspace code of conduct, always clean up after use – return all belts and jigs to the designated spot on the shadow board and sweep up any metal filings and put them in the appropriate bin. If there is any damage the machine or missing parts/belts/jigs, please leave a note on the machine, make it known to other members via the Discourse Forum and let committee know.
Please remember to log out from the RFID box - or put the plug back in the lock box before you leave.
PPE
- Dust mask
- Safety Glasses
Induction
Due to the risks involved an induction is required to use this machine; You will find the link at the bottom of this page. Once you have passed the online induction, you will be given the code to unlock the power plug.
This will be moving to the online induction system on the membership portal PC in the laser cutting room and the RFID - Bleepy box system- linked to your fob/membership card.
Once you are inducted only you will be able to use this machine. Do not unlock the machince for others to use. This machine cannot be used by others non-members or members who have not done the online induction, even if you are supervising them.
Introduction
The Robert Sorby ProEdge is a sharpener for chisels, drill bits, planes, knives and garden tools.
It is not to be used to sand wood. Please use our bigger belt sander for this.
Location
This will be kept in the hot works area bolted to the grinding bench. Due to the potential for sparks, and heavy usage that would need the roller shutter to be opened.
Manual
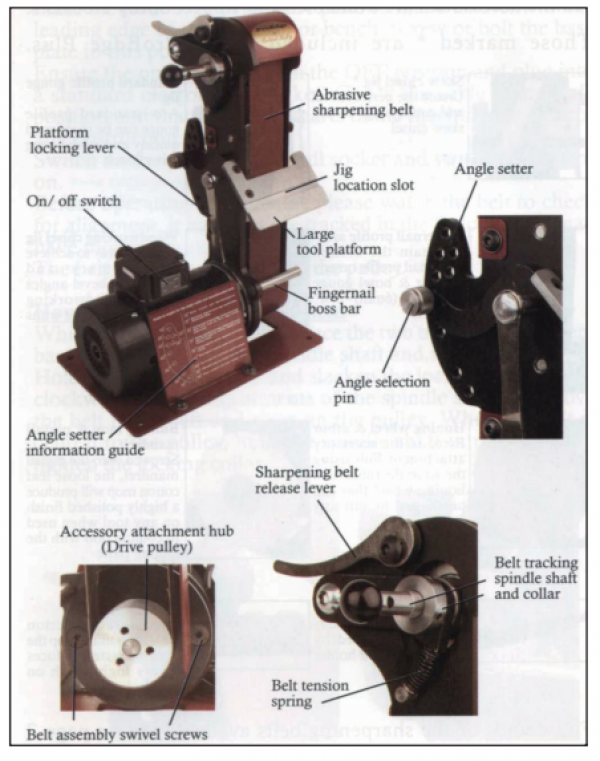
Parts of the unit
Accessories


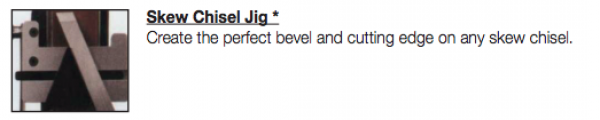


We have two knife jigs; Large (for knives above 8”) & Small (for knives up to 8”)
Current Belt Grits available at the Hackspace
- 60 grit
- 120 grit
- 240 grit
- 600 grit
- Leather honing belt (must be used with paste)
See the catalogue for belt codes - https://ebookhq.co.uk/robert-sorby/catalogue-2017/html5/index.html?page=51.
How to Use
Please read through the manual, below is some guidance for this in the space.
Tilting the Sharpening belt assembly
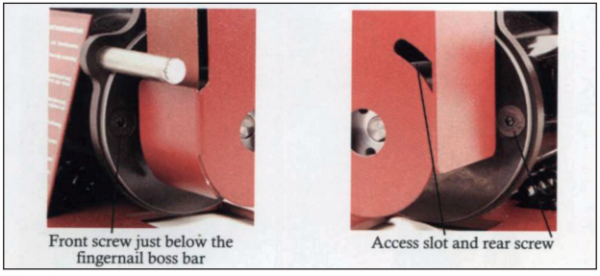
To assist in sharpening tools the ProEdge has a very useful feature in that the sharpening belt assembly can be angled backwards to allow for a much more comfortable position when sharpening at shallow angles.

This is done by loosening the two screws next to the drive pulley and gently moving the belt assembly to your desired angle. When the belt assembly is tilted backwards the rear screw is accessed via the access slot in the side guard as shown below. When the desired angle is achieved, re-tighten the screws to secure the belt assembly in place.
Changing Belts
Sharpening Wood Turning Tools
Sharpening Knives
Tools, heat and temper
All woodworking tools and knives are usually tempered. This is the process of heating a tool to an extremely high temperature and then dipping it into water. This is done to harden the metal which makes it more durable.
If we allow our tools to heat up too much as we sharpen them, we are ruining this temper and in turn, reducing the durability of our tools.
For this reason, it is vital that you do NOT let the tools heat up too much.
There are a few techniques with will stop the tool from heating up too much when you are sharpening it.
- Do not hold the tool against the belt for any longer than a few seconds at a time.
- Do not press the blade into the belt as you sharpen, just allow for light contact.
- Try dipping the tool into cool water between passes on the belt to keep the temperature down.
Woodturning tool bevel and clearance angles
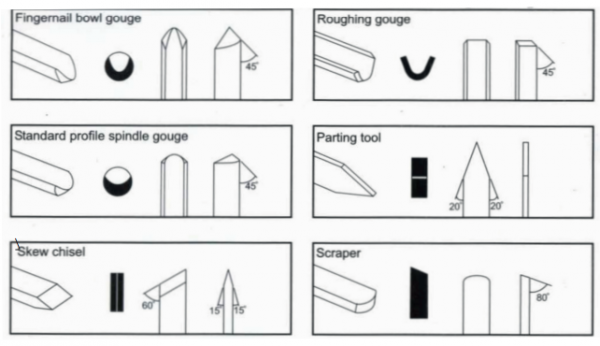
The diagrams below show details of the angles and profiles supplied on Robert Sorby tools.
The images are broken into four sections from left to right.
1. A general view of what the tool looks like.
2. An end view showing the actual cutting edge profile.
3. A top view showing the shape of the cutting edge as seen when using the tool, together with any relevant profile angle.
4. A side view with the recommended bevel or clearance angle depending on the type of tool being sharpened.
Woodworking chisel and plane iron bevel angles
The diagrams below show all the views as described above but with the addition of the two showing the primary and secondary bevel angles depending on the type of wood to be worked.

Please refer to the angle setter information guide on the front of the system for more recommended bevel angles.
Clean up
Please clear away the dust and debris after use, sweep up all the metal filing and put them in the appropriate metal waste bin. Return all belts and jigs to their designated spot on the shadow board. If there is any damage the machine or missing parts/belts/jigs, please make it known to other members via the Discourse Forum.
Consumables
- Sorby sharpening belts 60,120 and 240 grit Aluminium - A6 and A16 Trizact
Known Issues
No reported issues at this time, but please let committee know or add them here with the date and solution (if there is one).
Induction test
Please click the link below to complete the induction test
https://forms.gle/FFtG9fgRpu9WkbZ57